Today I installed all 16 stickmen, all 16 Velcro (hook) on the envelope and closed up my last gore seam! It is so close to having its first cold inflation! I was hoping to have it done this weekend, but all my "free time" suddenly disappeared. There is still a chance I could finish it, but it might have to wait till next weekend.
Here's the new list of what is left to do on the envelope:
1) Cut and tie in parachute lines and turning vent lines
2) Install the (3) pulleys/rings for the turning vent and parachute lines
3) Install ties for the thermistor wire and install thermistor wire
4) Install gore ID numbers
5) Sew in the crown ring to the top webbing & tie on crown line
6) Attach suspension cables
7) Purchase 4 steel carabiners
8) Trim any extra loose threads
9) Complete a gore by gore
I actually have 10th thing to do, install my N number. Unfortunately, I have to wait till I have the airworthiness inspection before I can install it...legally.
*Once I complete 1-9 I will do a cold inflation, take a few pictures and then start making the time lapse video for the envelope*

This blog will follow my experience building my first home-built experimental hot air balloon.
Friday, September 30, 2011
Thursday, September 29, 2011
Building The Man....Stickman That Is...
I managed to drag the balloon out again yesterday to finish putting on all (4) of the horizontal load tapes. It was quite the experience forcing the fabric through the throat of the sewing machine on the horizontal load tapes at the equator. It may be a small balloon, but there is still a lot of fabric to handle at that section. After I had the last one installed, I was happy to check off another item from my "to do list".
Pictured: Finishing the throat of the balloon...and my dog giving me moral support like he always does.

Once I pulled the balloon out of the sewing machine, I was contemplating if I should start my stickmen or just wait until this Friday/weekend. The sewing machine was acting up a little bit (bobbin casing was catching my top thread and jamming the machine every 20-30 feet or so) and I didn't want to deal with the frustration of that happening while I put in 16 stickmen. So instead, I prepared all the pieces I needed and just installed one. I doubled up the load tape to give the tie off loop a little more strength. It probably wasn't necessary, but then again, why not?
So here is my first stickman:

I placed the stickmen on the half gore seam (not on the vertical load tape) mainly because of how the colors of the parachute would line up. In the picture below, the blue dots are my Velcro tabs which are on the seams of the parachute. If I were to have the Velcro tabs line up with the envelope vertical load tapes, the colored points of the parachute wouldn't line up with the diamonds on the envelope.
 So instead, I installed the stickmen and Velcro on the half gore seam so the pattern will line up like this:
 It might be a subtle difference in the drawing, but I know it will make a big difference once the balloon is inflated.
I plan on installing the remaining 15 stickmen, 16 envelope Velcro, gore numbers and closing up the last gore seam this weekend. Once it is closed up I'm going to partially cold inflate it in the shop to take a few interior pictures. Check back in the next few days for another progress update!
Pictured: Finishing the throat of the balloon...and my dog giving me moral support like he always does.

Once I pulled the balloon out of the sewing machine, I was contemplating if I should start my stickmen or just wait until this Friday/weekend. The sewing machine was acting up a little bit (bobbin casing was catching my top thread and jamming the machine every 20-30 feet or so) and I didn't want to deal with the frustration of that happening while I put in 16 stickmen. So instead, I prepared all the pieces I needed and just installed one. I doubled up the load tape to give the tie off loop a little more strength. It probably wasn't necessary, but then again, why not?
So here is my first stickman:

I placed the stickmen on the half gore seam (not on the vertical load tape) mainly because of how the colors of the parachute would line up. In the picture below, the blue dots are my Velcro tabs which are on the seams of the parachute. If I were to have the Velcro tabs line up with the envelope vertical load tapes, the colored points of the parachute wouldn't line up with the diamonds on the envelope.


I plan on installing the remaining 15 stickmen, 16 envelope Velcro, gore numbers and closing up the last gore seam this weekend. Once it is closed up I'm going to partially cold inflate it in the shop to take a few interior pictures. Check back in the next few days for another progress update!
Monday, September 26, 2011
Dee Ring Install
I found an extra hour or two during the day to install the Dee Rings at the throat (to attach the skirt and suspension cables). Before I slid the ring onto the load tape to create my loop, I added an extra piece of load tape to the inside of the gore load tape to serve as a friction pad for the Dee Rings. I highly doubt the rings would cause any damage from rubbing (I haven't seen any damage on other balloons in all my years working at the repair station) but I figure the simple addition couldn't hurt. Now, if the rings do begin to damage the load tape, I can simply open up the loop, remove the extra piece of load tape and sew in a new one. It sure beats having to splice in a couple feet of load tape on each (potentially) damaged loop. Here are a few pictures:
The extra piece of load tape
 Here it is sewn into place
 A closer view
 Here is the Dee rings installed on the loop
 A better view of the loop and Dee Rings
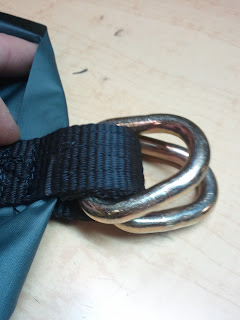 A side view of the loop, friction load tape and two Dee Rings installed

I have 15 of the 16 loops with Dee Rings done. I haven't closed up the balloon yet so I still have one more gore seam to complete. I wont close it until I add my circumferential load tapes. I installed 1 of them today and will hopefully install the other three on Wednesday the 28th.
The extra piece of load tape


I have 15 of the 16 loops with Dee Rings done. I haven't closed up the balloon yet so I still have one more gore seam to complete. I wont close it until I add my circumferential load tapes. I installed 1 of them today and will hopefully install the other three on Wednesday the 28th.
Sunday, September 25, 2011
Within Reach
Ill keep this one short....
Over the last two days I have manged to sew together all of the gores, and assemble my turning vent. I have one last gore seam till the balloon is closed up (besides the throat and valve of course). I am so close to being finished, I can taste it! Here is a few pictures of what Ive done since the last update.
Outer turning vent cut
 Inner turning vent
 Inner and outer turning vent sewn together
 Another view of the turning vent. It is hard to see the outer turning vent from the inner. I am hoping it stays that way when it is inflated!
 A better view of the turning vent edge.
 Bottom edge of the turning vent...
 I added the load tape to the valve edge.
 Intersection of the gore tape and valve edge.
 The mass of fabric which is almost a balloon!
 The PFAFF is a beast of a machine and hasn't let me down!

Here is a list of what I have left to complete on the envelope:
1) Close up the last gore seam
2) Sew on the (5) circumferential tapes
3) Cut and tie in parachute lines and turning vent lines.
4) Install the (3) pulleys/rings for the turning vent and parachute lines
5) Install ties for the thermistor wire
6) Install gore ID numbers
7) Sew in the crown ring
8) Sew in Dee Rings at the throat & hook up suspension cables
I estimate I have about 15-20 more hours of work before the envelope is completed. Once that is done, Ill begin on building the lower end. Check back soon...I may have the envelope done by the end of the month!
Over the last two days I have manged to sew together all of the gores, and assemble my turning vent. I have one last gore seam till the balloon is closed up (besides the throat and valve of course). I am so close to being finished, I can taste it! Here is a few pictures of what Ive done since the last update.
Outer turning vent cut


Here is a list of what I have left to complete on the envelope:
1) Close up the last gore seam
2) Sew on the (5) circumferential tapes
3) Cut and tie in parachute lines and turning vent lines.
4) Install the (3) pulleys/rings for the turning vent and parachute lines
5) Install ties for the thermistor wire
6) Install gore ID numbers
7) Sew in the crown ring
8) Sew in Dee Rings at the throat & hook up suspension cables
I estimate I have about 15-20 more hours of work before the envelope is completed. Once that is done, Ill begin on building the lower end. Check back soon...I may have the envelope done by the end of the month!
Tuesday, September 20, 2011
What. A. Month...or Two?
There are many words which could describe the last two months of this project. "Inactive", "dead" and "dormant" are all viable choices. Possibly the most appropriate descriptive word is "interrupted". My progress has been interrupted by work, time conflicts and non-existent floor space...but it hasn't been interrupted by a lack of motivation.
It wasn't until yesterday that I realized it has been two months since I have updated this blog (or journal?) with anything of real substance. Not one substantial piece of progress had been made on my project. This aggravates me. Each and every day I see the pieces of my balloon sitting in the corner of the shop, folded neatly, awaiting assembly. I hadn't forgotten about the balloon by any means. Most days I wondered how I could manage to clear the floor for a significant amount of time to get one more seam sewn together. Those delusional dreams were usually crushed by the arrival of another balloon which would be placed inconveniently where I was going to lay out my fabric... such is life...
But today was different. My day dream lasted longer than usual. I was thinking about how great it would be to have a full day to work on putting together the 16 gores and be able to finally have an update for the people anxiously awaiting news on the build (right?). Then something unusual happened...absolutely nothing! Nobody was coming in today, the floor was clear, and I had the entire shop to myself! Let the PROGRESS BEGIN!
The short and sweet of assembling the gores:
Each seam (with load tape) takes approximately 40 minutes to sew. This is without a folder or a tape guide. Unfortunately the coating on my 1.9oz fabric does not like to slide through the seam folder, nor on the sewing machine table. This causes my sewing time to increase because the fabric drags a considerable amount. The occasional application of dry silicon spray helps, but doesn't last very long.
I have left 18 inches of extra load tape at the throat of the balloon so I can double it back to create a 1 inch loop which will contain two 5000lb Dee Rings and the remaining 16 inches will be sewn to itself to provide structural support. Some might wonder why I chose 5000lb Dee Rings for such a small balloon and the answer is simple...they were cheaper than the lower load rated ones. One ring will serve as the skirt attachment point and the other will attach to a rapid link which connects my suspension cables (seen towards the end of this post). As of today, I have managed to assemble a total of 8 gores. HALF THE BALLOON! I greatly exceeded any and all expectations of work to be completed today. My passion for the project has been reignited, and it feels great!
Here are a few photos of 6 gores sewn together. I have said it before, and Ill say it again! "The colors pop so well against the dark fabric" I cant wait to see it inflated!"


Sewing the fabric wasn't the only thing I manged to get done today. I also made my stainless steel suspension cables. 8 double sets of 1/8 inch cable. They are strong, sturdy and weight tested. The rapide links will attach to the Dee Ring on each gore tape of the balloon.
Pictured: Nicropress tool, a small thimble which attaches to the rapide link, a large thimble which attaches to a carabiner, 1/8 inch SS cable and a copper ferrule.

16 Rapide Links which will attach to the Dee Rings on the envelope throat edge.

Completed thimble ends with rapide links attached.

All 8 double sets completed.

With any luck, I will be able to begin working on the remainder of the envelope tomorrow. Hopefully the floor will remain cleared for me...check back soon!
Subscribe to:
Posts (Atom)